

A bathroom can look clean while dampness gathers in grout, around fixtures, or behind surfaces. To prevent mold in a San Francisco bathroom, control moisture: run the exhaust fan during a shower and for at least 30 minutes afterward, and keep indoor humidity no higher than 50 percent, according to the Centers for Disease Control and Prevention.
If you’ve noticed a musty smell or a discolored patch, you may be wondering whether it’s mold and what to do next. Mold can appear as fuzzy, slimy, or powdery patches in shades of green, black, white, or orange. Recognizing possible growth is a useful first step.
This guide explains where bathroom mold tends to grow, how to identify and clean it safely, and why recurring growth can point to a leak or hidden moisture. You’ll also learn ways to manage humidity and ventilation, and what tenants can do when dampness or mold persists. The goal is a clear, step-by-step approach that helps you respond early and understand when a problem may need more than routine cleaning.
Key Takeaways
- Look for fuzzy, slimy, or powdery discoloration and a musty odor when checking bathroom surfaces and hidden moisture-prone areas.
- The U.S. Environmental Protection Agency recommends hiring a contractor or professional service when bathroom mold covers more than 10 square feet.
- If mold keeps returning, investigate possible moisture behind tile, plumbing, or other building materials rather than treating only the visible patch.
- Reduce lingering water by wiping shower walls, using a squeegee, and keeping towels and bath mats clean and dry.
- If you rent, document persistent dampness or mold and report it to your landlord so the underlying moisture problem can be addressed.
Where Does Mold Grow In Bathroom?
Glazed tile, glass, and solid-surface materials resist moisture better than porous drywall or fabric. Grout, caulk, and seams can still hold water, so even a tiled shower needs regular drying.
In San Francisco, prevention costs depend on whether you need cleaning supplies or exhaust fan installation. Fan type, wiring, duct routing, and access affect an installation quote, which follows a quote request.
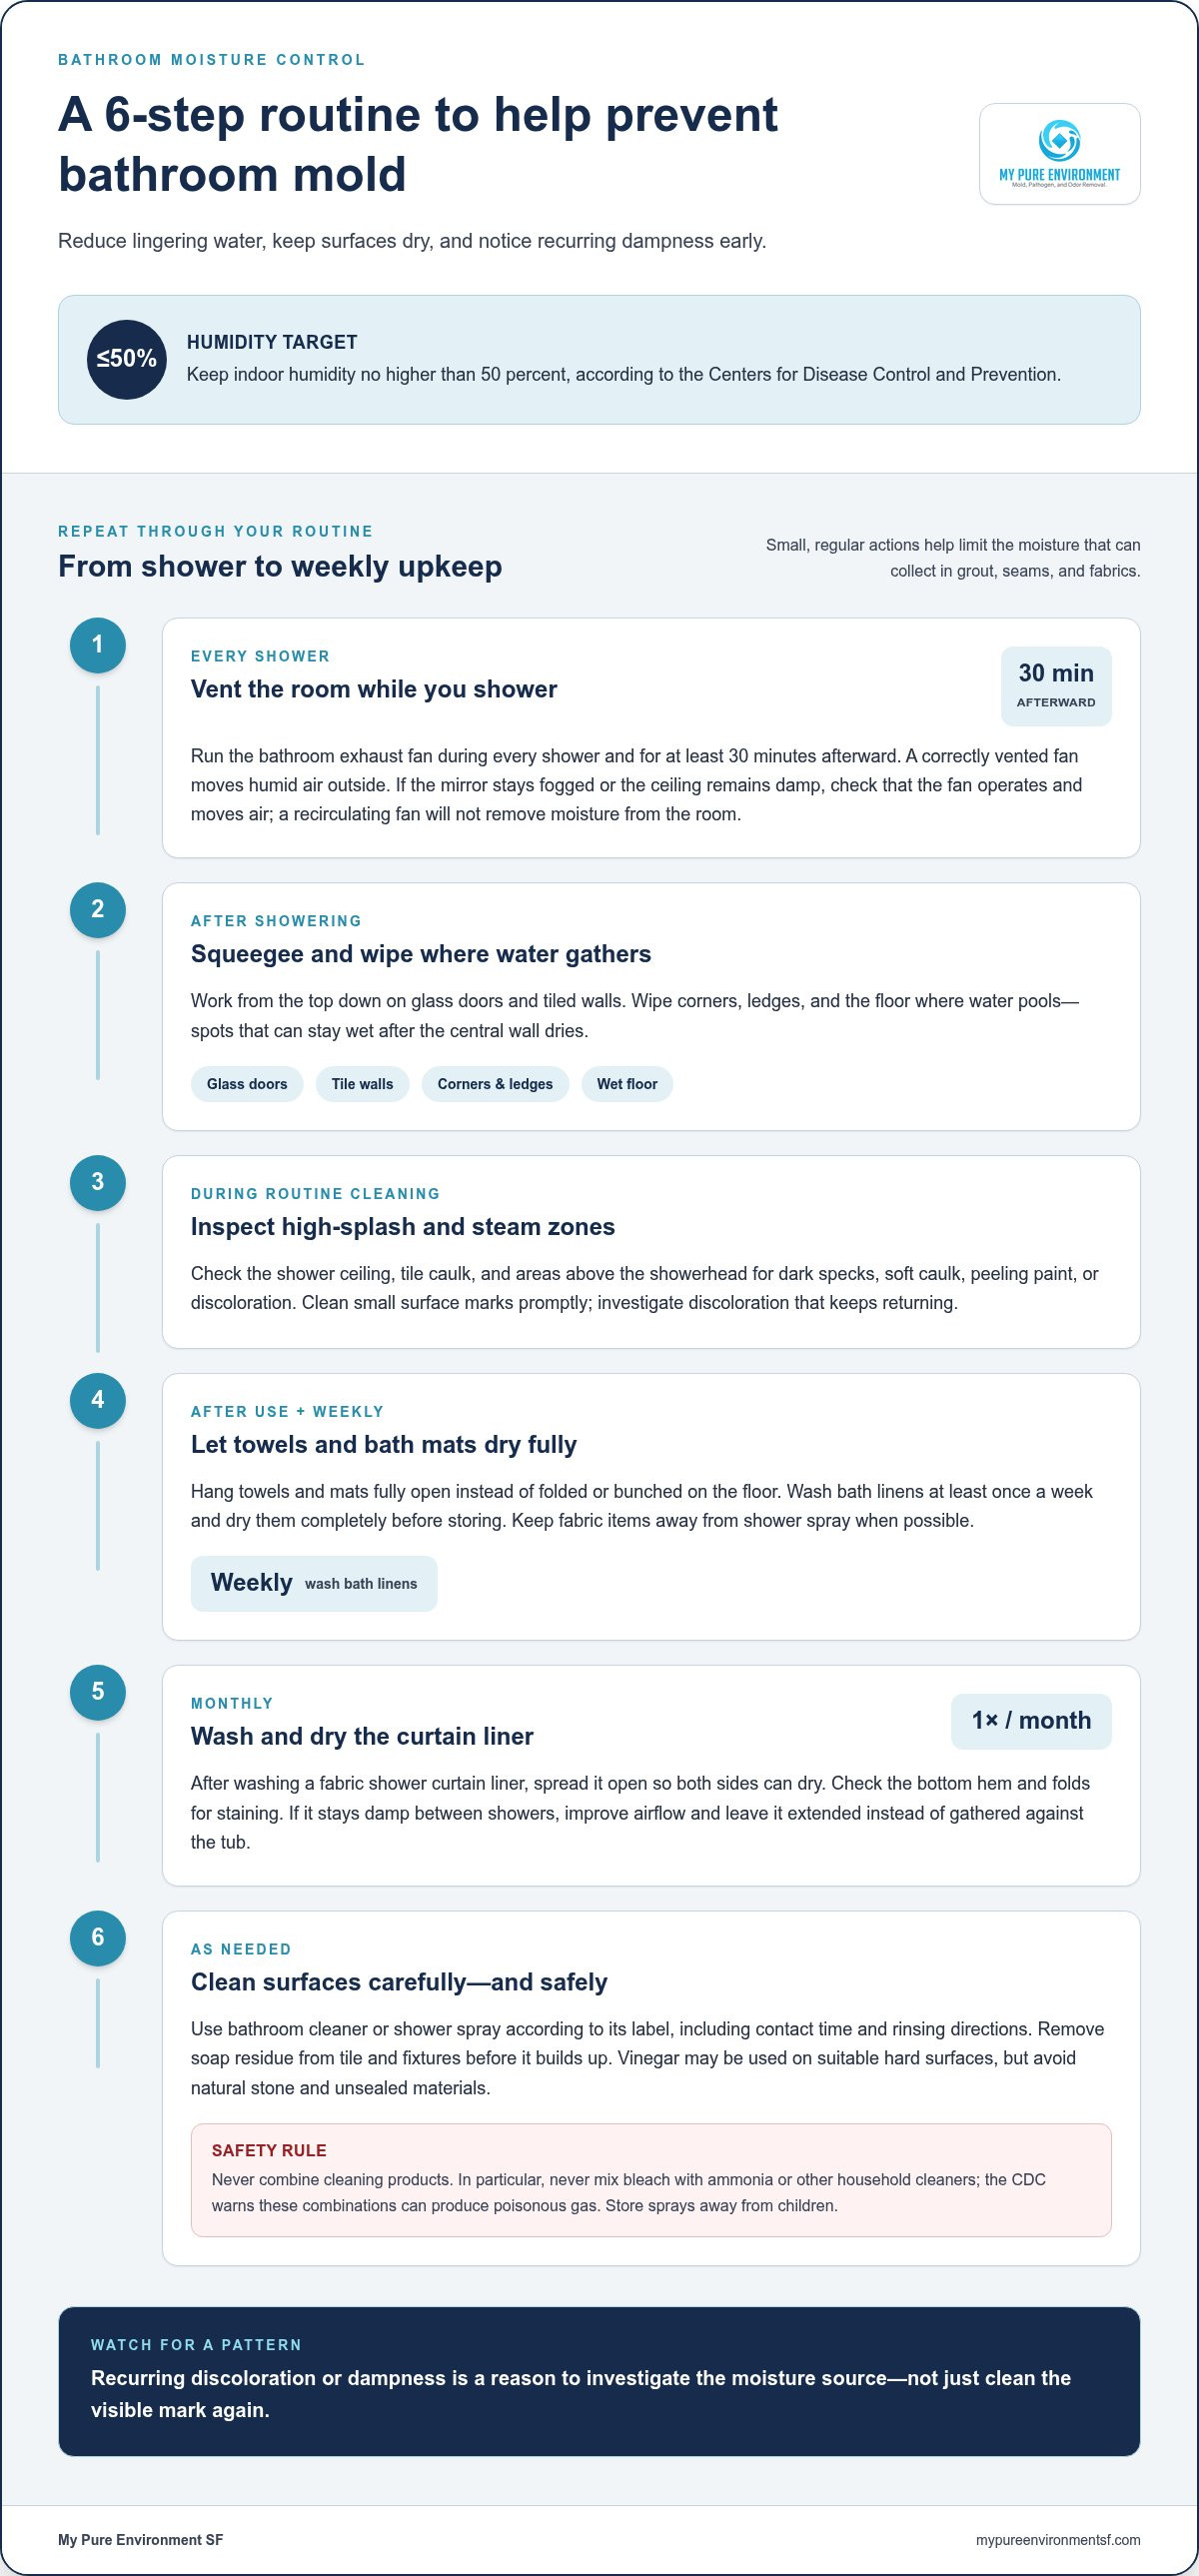
- Run the bathroom exhaust fan during every shower and for at least 30 minutes afterward. The fan moves humid air outside when it is correctly vented, reducing condensation on ceilings, mirrors, and walls. If the mirror stays fogged or the ceiling remains damp, check whether the fan is operating and moving air. A fan that only recirculates air won’t remove moisture from the room.
- After showering, use a squeegee on glass doors and tiled walls, working from the top down. Wipe corners, ledges, and the floor where water pools, since these spots can remain wet after the central wall dries. Keep the squeegee within reach to make this easy to repeat after each shower.
- During routine cleaning, inspect the shower ceiling and tile caulk for dark specks, soft caulk, peeling paint, or discoloration above the showerhead. These areas get repeated steam or splashes, and cracked caulk can leave seams damp. Clean small surface marks promptly, but investigate discoloration that keeps returning.
- Hang towels and bath mats fully open after use instead of leaving them folded or bunched on the floor. Wash bath linens at least once a week and dry them completely before storing. A damp towel against a wall or a mat on wet tile can trap moisture. Keep fabric items away from shower spray when possible.
- Wash a fabric shower curtain liner monthly, then spread it open so both sides can dry. Check the bottom hem and folds for staining, where water and soap residue can linger. If the liner stays damp between showers, improve airflow and leave it extended rather than gathered against the tub.
- Use a bathroom cleaner or shower spray according to its label, including the stated contact time and rinsing directions. For routine upkeep, remove soap residue from tile and fixtures before it builds up. Vinegar may be used on suitable hard surfaces, but avoid natural stone and unsealed materials. Never combine cleaning products, and store sprays away from children.
Mold identification, testing, and cleanup
- During regular cleaning, inspect shower corners, grout, caulk, ceilings, and the areas beneath the sink. Bathroom mold may look like fuzzy, slimy, or powdery discoloration in shades of green, black, white, or orange. A musty odor can also signal growth, including in a damp cupboard or behind stored items. Note where a mark appears and whether it returns after cleaning.
- Estimate the affected area before choosing a cleanup approach. The U.S. Environmental Protection Agency recommends hiring a contractor or professional service when bathroom mold covers more than 10 square feet. Growth spread across several surfaces, repeated staining, or signs of moisture inside a wall also calls for professional assessment. A surface test alone won’t correct the moisture source.
- For a small patch on a hard, nonporous surface, clean the area with detergent and water, then dry it completely. If using household bleach, use no more than 1 cup per 1 gallon of water. Scrub the affected surface, let it sit for 10-15 minutes, then scrub again. Follow product labels and keep the room ventilated during cleanup.
- Never mix bleach with ammonia or other household cleaners. The Centers for Disease Control and Prevention warns that these combinations can produce poisonous gas. Use one cleaning product at a time and rinse surfaces as directed on its label. Don’t assume a cleaner has reached mold inside porous materials, such as ceiling tiles or carpet. These materials may need to be discarded because growth can remain in their spaces and crevices.
- Make cleaning a repeatable bathroom routine. Remove soap film from tile, glass, and fixtures, then dry surfaces that remain wet. Daily shower sprays can help loosen residue between deeper cleanings, but choose a product suited to the surface and follow its directions. A spray won’t replace cleaning visible growth or addressing persistent dampness. Avoid layering products, even if one is marketed for everyday use.
- Consider testing and inspection when the source or extent of growth is unclear, especially if discoloration returns after cleaning. A useful assessment considers visible growth, moisture, and affected materials together, rather than relying on a test result alone. For recurring bathroom staining, professional mold testing and inspection can help clarify the problem and inform the next steps.
Repairing plumbing, roof, and tile leaks
- Trace the damp area before treating visible mold. Check beneath the bathroom sink, around faucet connections, beside the toilet, and along the tub. Look for water stains, swollen cabinet panels, loose flooring, or a persistent damp smell. Note nearby fixtures and whether the mark changes after use. These observations can help pinpoint a plumbing leak rather than just its visible effects.
- Check plumbing fixtures during normal use, then inspect nearby surfaces. Run the sink and shower separately, watching supply lines, drain connections, and the tub edge for drips. A leak may be hidden inside a vanity or behind a wall, so look for recurring stains or dampness in the same area. Don’t cover a mark with paint or caulk before finding the water source.
- Inspect tile joints and caulk where the shower meets the wall, tub, or floor. Cracked, missing, or separated sealant can let water reach materials behind the tile. Note the location and extent of any gap, and watch for staining that returns after cleaning. Caulk can seal a surface joint, but it won’t fix a plumbing leak or moisture already trapped behind the wall.
- If bathroom staining appears on the ceiling, especially near an exterior wall or upper-floor roofline, consider whether roof moisture could be involved. Note whether the mark grows after wet weather or stays damp between showers. Check accessible areas for discoloration or a musty odor, but don’t open walls or ceilings yourself. A recurring ceiling stain may point to water entering above the bathroom, not just shower steam.
- Have the moisture source addressed before cleaning recurring mold or replacing stained finishes. Leaking supply lines, drains, or fixture connections need repair, as do roof or tile leaks. If moisture has reached building materials, professional repair or removal may be needed. Recurring bathroom mold can indicate dampness behind surfaces, so treating only the visible patch won’t resolve the underlying problem.
- After the leak is repaired, keep a simple record of the affected area and check it during routine bathroom cleaning. Look for new discoloration, damp grout, peeling paint, or a musty smell. If the same patch returns, note when it appears and what fixtures or weather conditions came before it. This pattern can help distinguish a lingering leak from ordinary shower moisture and guide further assessment.
Signs and potential health effects of bathroom mold
- Record visible changes as you clean the bathroom. Note the exact surface, appearance, and whether the mark returns. Mold may look like fuzzy, slimy, or powdery discoloration, while water staining can leave a different mark. Check ceiling paint, grout, caulk, and the cabinet beneath the sink. A dated note or photo makes changes easier to compare.
- Pay attention to musty odors around specific bathroom areas. Check whether the smell is strongest near a shower corner, vanity, or ceiling stain. A persistent odor can accompany growth that isn’t immediately visible, especially where damp materials are enclosed. Record when you notice it and whether it remains after the bathroom dries. Don’t cover an unexplained odor with fragrance or paint.
- Notice whether symptoms occur in the same setting as suspected mold. Mold can cause a stuffy nose, sore throat, coughing or wheezing, burning eyes, or skin rash in some people. Record the symptom, when it began, and whether it occurs around bathroom use or elsewhere. This log can help show a recurring pattern without assuming a cause.
- Respond to symptoms calmly and focus on the environment. A symptom alone doesn’t identify its cause, and mold can’t be confirmed by appearance alone. Note visible growth, dampness, and odors alongside symptoms rather than drawing conclusions from a single sign. If coughing, wheezing, burning eyes, or a rash concerns you, discuss it with a healthcare professional.
- Limit contact with a visibly affected area while you assess it. Avoid touching or disturbing mold, particularly if it covers a broad area or appears on porous materials. Keep towels, toiletries, and other personal items away from the affected surface. If the mark spreads, returns after cleaning, or appears alongside persistent dampness, document the change and address the moisture source.
- Choose your next step based on all the observations. A small surface mark, a recurring ceiling stain, and a musty cabinet odor point to different conditions to investigate. Record affected locations, recent changes, and any symptoms, then use those details to guide an assessment. If growth is widespread or hidden behind materials, professional inspection can clarify its extent and inform safe cleanup.
Tenant responsibilities for moisture and humidity
- Track indoor humidity with a hygrometer, especially after showers or when condensation lingers. The Centers for Disease Control and Prevention advises keeping indoor humidity at no higher than 50 percent to inhibit mold growth. Note readings alongside visible condensation on windows, walls, or the bathroom mirror. A record can help show whether moisture is an occasional shower effect or a persistent household concern.
- Use the bathroom fan or vent during showers to move humid air out of the room. If there’s no working fan, open a window when conditions allow and leave the door open afterward. Don’t block vents with towels or storage. If the fan seems ineffective, report the issue to your landlord instead of attempting electrical or duct repairs yourself.
- Wipe bathroom walls and other wet surfaces after showering. Use a towel or squeegee on tile, glass, and ledges, then leave the area open to dry. Water left on a wall or pooled beside the tub keeps surfaces damp. Note recurring wet patches, particularly if they appear away from the shower spray.
- Keep a simple weekly bathroom cleaning routine. Clean the shower, sink, and floor, removing soap residue that can collect along tile and fixtures. Wash towels and bath mats at least once a week and dry them fully. A bunched mat or damp towel against a wall can trap moisture between cleanings.
- Document leaks and recurring mold with dated notes or photographs. Record the location, appearance, odor, and whether the area changes after showering or wet weather. Send the details to your landlord in writing, describing the specific condition, such as a spreading ceiling stain or a damp cabinet beneath the sink. Keep copies of messages and responses.
- Ask your landlord to address persistent mold and its moisture source, not just the visible stain. If the issue remains unresolved, renters can consider a licensed inspection and report the concern to the local housing authority. The state department of public health or environmental protection may also provide guidance.
If persistent moisture is affecting the bathroom air, explore indoor air quality support as a way to understand the concern and possible next steps.
My Pure Environment SF: Mold Remediation
My Pure Environment SF provides Bathroom Mold Removal when visible growth persists, returns, or extends beyond routine cleaning. If the extent or location of mold is unclear, Mold Testing & Inspection can help assess the concern and inform next steps. Addressing mold involves more than cleaning a surface: moisture and affected materials also need attention. For concerns that extend beyond the bathroom, Mold Remediation and Indoor Air Quality Improvement may help address the broader indoor environment. These services can clarify the issue and guide a suitable response alongside routine ventilation, drying, and leak repairs.
For help understanding persistent bathroom mold, contact My Pure Environment SF to discuss your concern.
Make Your Next Step a Healthier Bathroom
A lasting prevention plan comes from ordinary routines, not waiting for the next visible stain. Start with one practical habit, such as checking damp-prone areas during your weekly clean or keeping a record of recurring moisture. To prevent mold in a San Francisco bathroom over time, treat changes as useful signals: a returning mark or persistent odor deserves attention beyond surface cleaning.
When mold or indoor air concerns need more than routine upkeep, My Pure Environment SF offers Mold Remediation, Mold Testing & Inspection, and Indoor Air Quality Improvement. These services can help assess the concern and guide a response based on the bathroom’s condition.
For a considered next step, contact My Pure Environment SF to discuss your bathroom mold or indoor air quality concerns. A clear plan can help you move forward with greater confidence and care for your home.
Frequently Asked Questions
What Does Mold Look Like?
Mold can appear as irregular patches, fine specks, or a spreading film, and color alone can’t identify its type. Look closely at places such as the underside of a vanity shelf, a window frame, or the edge of peeling paint. A stain may also come from dirt or water damage, so don’t rely on appearance alone to identify mold. Note its location and any changes before deciding what to do next.
What about mildew?
People commonly use “mildew” to describe certain surface fungal growth, but the term doesn’t reliably distinguish it from other mold. Even a light patch on a painted bathroom wall deserves attention if it returns or the surface stays damp. Don’t dismiss the concern because it looks like “just mildew.” Focus on the affected material, whether growth recurs, and whether moisture is present.
What humidity level prevents bathroom mold?
The Centers for Disease Control and Prevention advises keeping indoor humidity at no higher than 50 percent to inhibit mold growth. A hygrometer can help you monitor room conditions beyond the immediate shower period. If humidity remains high, consider whether moisture is accumulating elsewhere, such as in a laundry area or a poorly ventilated closet. The reading is useful context, but visible dampness still needs attention.
How should I ventilate a bathroom after showering?
After showering, keep the exhaust fan running and allow fresh air in through an open door or window when practical. If the bathroom has no effective fan, opening a window can help replace humid indoor air with outdoor air. Keep vents unobstructed, and don’t close the room immediately while surfaces remain damp. If the fan makes noise but moves little air, note the problem for follow-up.
How often should bathroom exhaust fans be used, and how long should they run?
Use the bathroom exhaust fan during every shower and leave it running for at least 30 minutes afterward. This gives the fan time to remove humid air after bathing ends. For a household with back-to-back showers, keep ventilation running through the sequence and afterward. If the fan doesn’t clear lingering condensation, note that pattern; airflow, ducting, or fan condition may need attention.
How do I clean bathroom mold safely and prevent it from returning?
For a small patch on a suitable hard surface, scrub with detergent and water, then dry the area thoroughly. If using bleach, the solution should contain no more than 1 cup of household laundry bleach per 1 gallon of water; let the scrubbed area sit for 10-15 minutes before scrubbing again. The Centers for Disease Control and Prevention warns never to mix bleach with ammonia or other household cleaners. Recurring growth means moisture also needs attention.
How can I prevent mold in shower grout, caulk, and tile?
To prevent mold in a San Francisco bathroom, start by checking grout and caulk for gaps, crumbling sections, or separation from the tub. Remove soap film from tile and rinse away cleaner residue according to its label. Store bathroom products in a dry area rather than against shower joints, where bottles can conceal damp spots. If discoloration reappears along the same seam, investigate moisture behind the surface instead of repeatedly covering the mark.
What are San Francisco bathroom ventilation requirements for homes?
San Francisco ventilation requirements depend on the project and applicable building-code provisions. Everyday fan use and planned ventilation changes may involve different considerations. Requirements can depend on whether the work involves new construction or changes to an existing bathroom, as well as how air is exhausted. Before planned work begins, identify its scope and applicable permit requirements.