

Cleaning ducts alone isn’t enough if mold-contaminated porous material remains or the moisture problem that fed it hasn’t been addressed. Mold in an HVAC system in San Francisco requires a targeted response: NADCA’s ACR standard classifies mold-contaminated porous materials as Condition 3, requiring removal, while sheet-metal ductwork can be cleaned with source-removal methods.
It’s understandable to want a clear answer after being told the ducts are clean. But cleaning alone doesn’t show whether the moisture source was found, affected materials were addressed, or the rest of the HVAC system was assessed. Those details matter when the goal is to prevent mold from returning, not just clean visible duct surfaces.
This guide explains what duct cleaning and mold remediation involve, how to spot moisture problems, and what can help reduce recurrence. It also covers containment and post-remediation assessment, along with practical next steps when you suspect mold in a San Francisco home or building.
Key Takeaways
- Look beyond the ducts: effective cleanup considers affected HVAC components and the moisture source that allowed mold to develop.
- Containment, negative pressure, and HEPA filtration help limit the spread of mold particles during remediation.
- Indoor air samples compared with an outdoor baseline can help assess conditions after treatment; clearance testing should happen before rebuilding affected areas.
- Inspect for leaks, condensation, and other dampness, then address the cause to reduce the chance of mold returning.
- When mold is suspected or cleanup needs assessment, mold testing and inspection or remediation can help guide the next steps.
Containment and cleaning of mold-contaminated ducts
California Health & Safety Code Section 17920.3 defines visible mold as a substandard building condition requiring remediation. AB 284 requires California landlords to disclose known mold conditions to tenants. These rules address property conditions and disclosure; duct cleaning still needs to address contaminated materials and moisture.
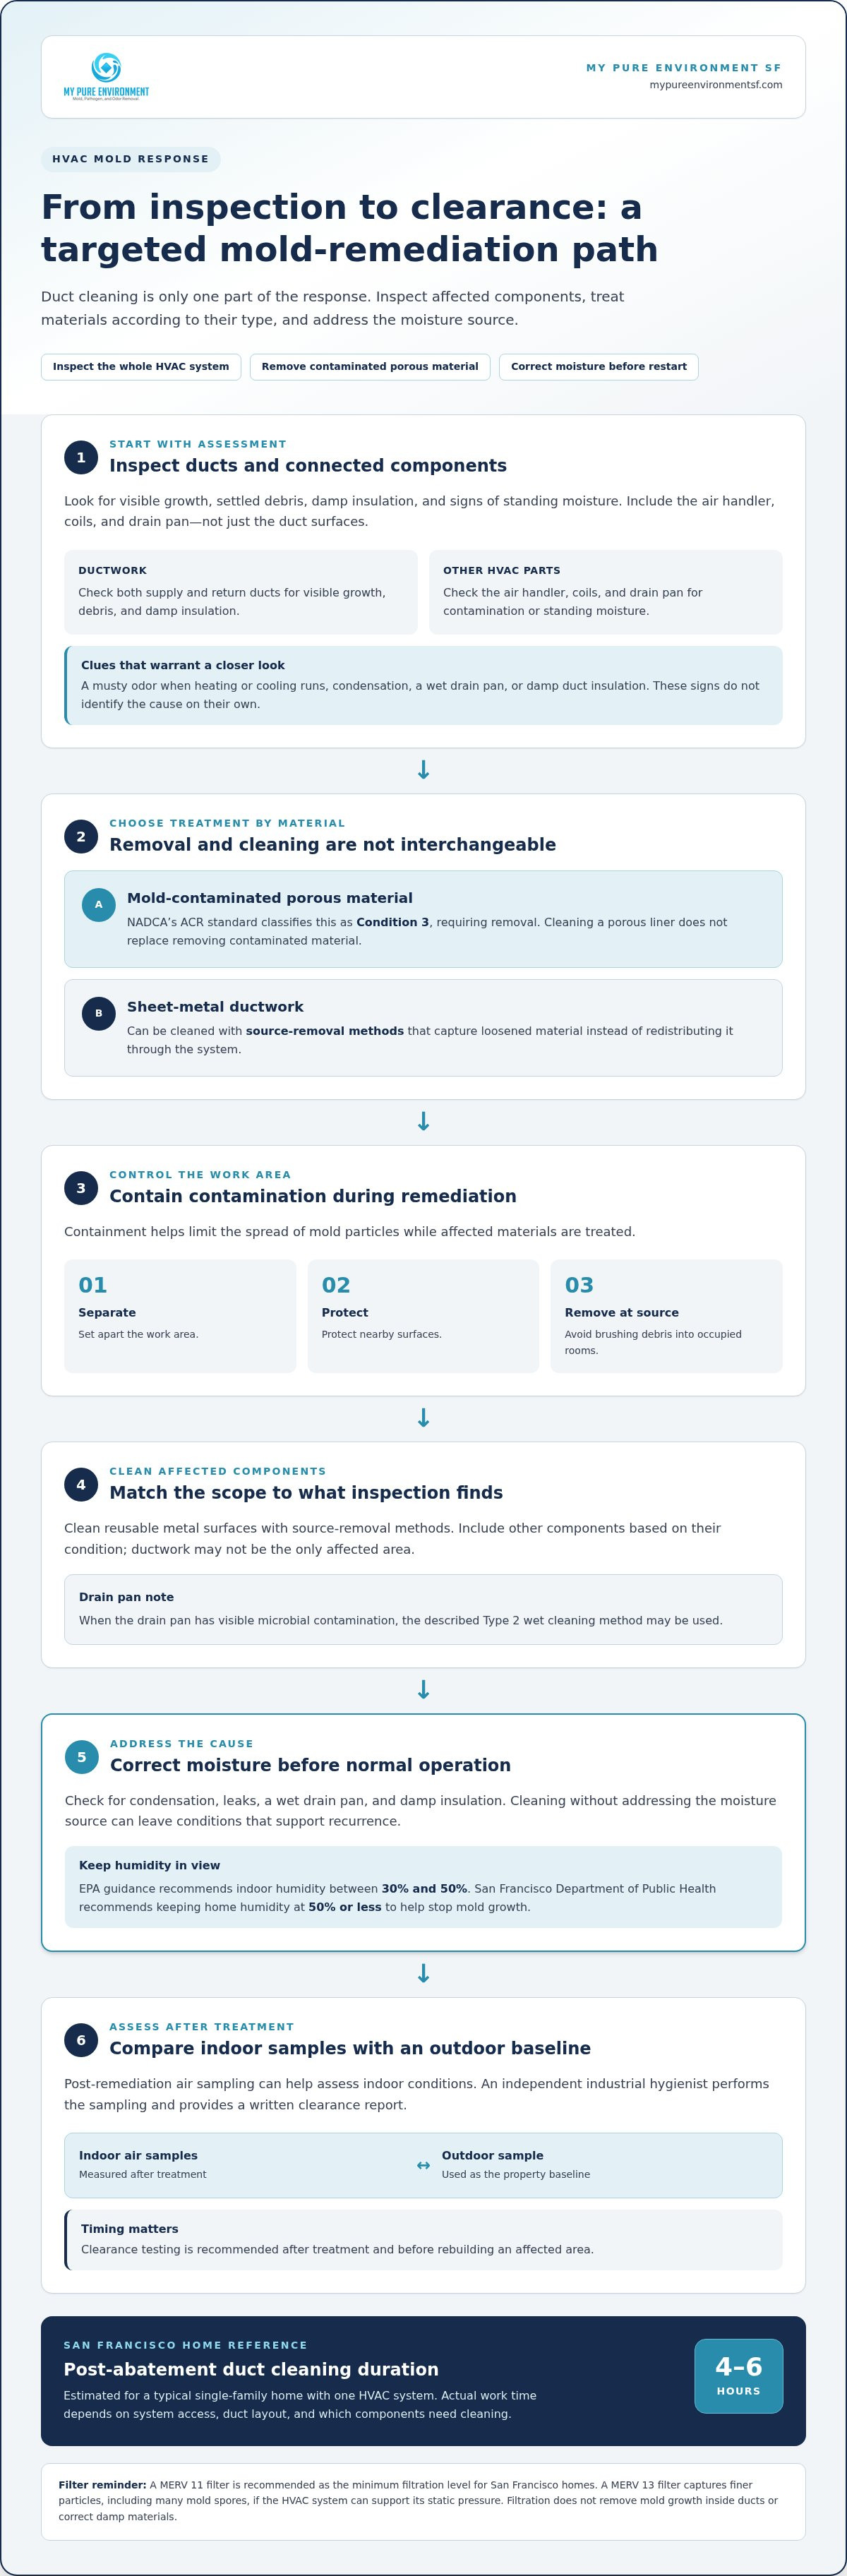
Start by separating removal from cleaning. NADCA’s ACR standard classifies mold-contaminated porous materials as Condition 3, requiring removal. Sheet-metal ductwork can be cleaned using source-removal methods. That distinction matters: cleaning a porous liner does not replace removing material that is mold-contaminated. The 2025 edition of NADCA’s ACR standard aligns with ANSI/IICRC S520 for HVAC system components.
Containment helps limit the spread of contamination during remediation. A typical sequence is to separate the work area, protect nearby surfaces, and use controlled source removal rather than brushing debris into occupied rooms. Mold spores can cling to duct surfaces, so cleaning should capture loosened material instead of redistributing it through the system. The approach depends on the duct material, visible growth, and access to affected sections.
- Inspect supply and return ducts for visible growth, settled debris, and damp insulation.
- Check the air handler, coils, and drain pan for contamination and standing moisture.
- Clean reusable metal surfaces with source-removal methods; remove mold-contaminated porous materials.
- Address the moisture source before returning the system to normal operation.
Air ducts may need cleaning if an inspection finds visible mold, accumulated debris, or moisture inside the system. A musty odor when the heating or cooling runs can also warrant a closer look. These signs don’t reveal the cause on their own. Check for condensation, a wet drain pan, or damp duct insulation, since cleaning without addressing moisture can leave conditions that support recurrence.
Cleaning may extend beyond the ducts. The air handler, coils, and drain pan can also collect contamination, so inspect them as part of HVAC restoration. When the drain pan has visible microbial contamination, the described Type 2 wet cleaning method may be used. Include components based on their condition, rather than assuming ductwork is the system’s only affected area.
For post-abatement duct cleaning in a typical San Francisco single-family home with one HVAC system, the estimated duration is 4 to 6 hours. The work time depends on system access, duct layout, and which components need cleaning. A thorough scope should distinguish duct cleaning from mold removal and identify the moisture correction needed to support restoration.
My mold remediation company said they "cleaned the ducts." Is that enough?
Not by itself. Mold exposure from HVAC systems can cause health problems, and moisture-related mold growth can damage building materials. Duct cleaning alone doesn’t establish whether affected materials were addressed, the moisture source was corrected, or indoor air quality was assessed. These are separate issues to resolve after cleanup.
Post-remediation air sampling can help assess indoor conditions. An independent industrial hygienist performs the sampling and provides a written clearance report. Indoor air samples are compared with an outdoor sample, which serves as a baseline for the property. This comparison puts measured levels in context rather than treating an indoor result as a verdict on its own.
Timing matters, too. Clearance testing is recommended after treatment and before rebuilding an affected area. If sampling happens only after repairs, finished surfaces may conceal areas that needed assessment. A useful review considers the results alongside the remediation work, visible conditions, and any remaining signs of moisture. It should also specify which areas and HVAC components were assessed.
Air filtration supports indoor air quality, but it doesn’t remove mold growth inside ducts or correct damp materials. A MERV 11 filter is recommended as the minimum filtration level for San Francisco homes. A MERV 13 filter captures finer particles, including many mold spores, if the HVAC system can support its static pressure. Filter choice should account for the equipment, because added resistance can affect airflow.
Humidity control addresses a different part of the problem. EPA guidance recommends keeping indoor humidity between 30% and 50%. The San Francisco Department of Public Health recommends keeping home humidity at 50% or less to help stop mold growth. A filter won’t correct a leak or persistent condensation, so assess both humidity and moisture sources when reviewing the results.
Use these steps to judge whether “cleaned the ducts” describes a complete response:
- Review whether the inspection covered ductwork and other relevant HVAC components.
- Confirm that indoor air samples were compared with an outdoor baseline.
- Look for a written clearance report from an independent industrial hygienist.
- Check that clearance testing took place after treatment and before rebuilding.
If results or visible conditions point to continuing contamination, the next step is targeted assessment and remediation rather than relying on filtration alone. A professional indoor air quality assessment can help clarify what the sampling and building conditions indicate.
Mold exposure from HVAC systems can adversely affect health.
Negative pressure, HEPA filtration, and containment
Containment limits disturbance during mold remediation in occupied buildings. ATI says it takes precautions to prevent mold spores and other contaminants from spreading during remediation.
Negative Pressure and HEPA Air Scrubbing
Negative pressure directs airflow into a contained work area instead of letting air move outward. A HEPA air scrubber filters airborne particles from the area as work proceeds. For a large work zone, owners should review the containment boundary, equipment placement, and where filtered air is exhausted.
These controls support the work, but they don’t remove mold from duct surfaces or address water damage. A clear scope identifies affected rooms and HVAC components, then explains how the work area will be separated from occupied spaces.
Preventing Spore Spread
Containment reduces the chance that disturbed spores travel beyond the treated area. For example, workers can isolate a room, cover openings, and keep tools and removed materials within the controlled work zone. The boundary should reflect the visible contamination and the access route needed for the work.
Look for a clear plan covering access points, debris handling, and movement between the work area and the rest of the building. In a property with shared hallways, doors and nearby surfaces need attention because people pass through them during remediation.
Reducing Duct Contamination
Identify moisture sources before returning the HVAC system to normal use. A damp filter, wet insulation, or condensation near a supply register can signal a condition that needs attention. Replacing a filter alone won’t resolve moisture inside a duct or prevent spores from being disturbed during work.
Protect supply and return openings during nearby cleanup, and avoid running the system while dust or debris is being disturbed. When work is complete, inspect accessible duct surfaces and HVAC components for remaining debris or dampness. This connects containment to the overall remediation plan instead of treating air cleaning as a stand-alone step.
For a larger project, the containment plan should account for the building layout, HVAC operation, and location of visible growth. A work area beside an active corridor, for example, may need a more carefully managed boundary than an isolated room. The goal is to control pathways for airborne particles during remediation.
After containment is removed, check the work area and nearby surfaces for settled debris, then address any remaining moisture. If mold is linked to water damage, correcting the source helps reduce continued contamination. These checks help establish whether cleanup covered the affected area and addressed conditions that contributed to mold growth.
Visual inspection and identification of moisture problems
Inspect accessible HVAC surfaces and nearby building materials for visible growth, staining, condensation, or musty odors. For a cautious visual check, turn off the system and use a flashlight at registers and the filter slot. Don’t enter ductwork or disturb suspected growth.
Visual Checks for Mold and Moisture
Start at the air handler, filter slot, supply registers, and return grilles. Look for dark spots, water stains, rust, damp insulation, or droplets around a cooling coil and drain pan. Note which rooms show signs and whether odors appear when the system runs. These observations can help connect potential duct contamination with conditions elsewhere in the property.
Discoloration alone doesn’t establish what caused it. Record its location and appearance, then check nearby surfaces for dampness or damage. If growth is visible, don’t scrape or brush it, since that can disturb material. An inspection can guide decisions about testing and whether affected areas need further assessment.
Finding Hidden Moisture Sources
Moisture can come from beyond the duct interior. Check around plumbing lines, windows, roof transitions, and HVAC condensate drainage for leaks, staining, or persistently damp materials. A clogged drain line or poorly draining pan can leave moisture near the air handler. Trace the water path instead of assuming the nearest visible mark is the source.
In apartments and condominiums, shared wall cavities and plumbing chases can connect conditions between units. If moisture appears near a shared wall, ask building management to consider adjacent spaces. Repairing the source before cleanup helps limit continued damage and supports better indoor air quality. Mold inspection can help identify areas that need closer evaluation.
Thermal Imaging and Moisture Meters
Thermal imaging can reveal temperature patterns that suggest a wet area or air leak behind a surface, but it doesn’t identify mold. Use the image to guide a closer inspection, such as checking a cold patch near a duct, ceiling, or exterior wall for staining and dampness.
A moisture meter can help assess materials such as drywall or wood when a leak is suspected. Compare readings across nearby areas and materials, then visually investigate unusual results. Together, these tools can focus testing and inspection, but they don’t replace checking HVAC components, the drain pan, and surrounding building surfaces.
San Francisco Moisture Conditions
San Francisco’s coastal fog contributes to ambient humidity across the Bay Area. Dense urban construction can also limit natural ventilation and sunlight, leaving some areas slower to dry. Inspect closets, shaded walls, and HVAC components where condensation or limited airflow may contribute to moisture.
Many San Francisco homes date from the 1890s to the 1920s, while stucco-over-frame construction continued through the 1950s in neighborhoods including the Sunset, Richmond, and Parkside. In older commercial buildings built before 1980, inadequate vapor barriers or envelope sealing can complicate moisture investigations. Match inspection methods to the property’s construction and observed damage.
After finding a leak or source of condensation, correct it before treating affected materials. Recheck the repaired area and nearby HVAC components for dampness, then assess whether testing is needed to clarify indoor conditions. This sequence links inspection to moisture-source repair and helps reduce the chance that the same conditions will contribute to mold growth again.
Preventing mold recurrence in HVAC systems
Preventing recurrence means keeping moisture from returning after removal. In San Francisco, a practical maintenance plan combines humidity control, HVAC inspection, and attention to condensation points. Each step addresses a different condition that can support visible mold.
Start with indoor humidity. The San Francisco Department of Public Health recommends keeping home humidity at 50% or less to help stop mold growth. Another prevention guideline advises maintaining household humidity between 30 percent and 60 percent. Use a humidity monitor in areas where dampness has appeared, then respond by improving moisture control and checking for leaks.
Next, inspect components where water can collect. Check the condensate drain, drain pan, coils, and accessible ductwork for standing water, dampness, or visible mold. Multistory buildings with complex HVAC systems can have several condensation risk points. An inspection limited to one air handler may miss moisture elsewhere, so consider the equipment and duct routes serving different floors.
Routine checks can catch developing problems early. Note musty odors, water marks, damp insulation, and changes near supply registers. These signs call for investigating the underlying moisture, not just cleaning or replacing a filter. A maintenance record can help track where symptoms appear and whether they return after repairs.
San Francisco’s year-round coastal fog elevates ambient humidity across the Bay Area. Dense urban construction can also limit natural ventilation and sunlight penetration. In commercial buildings, flat roofs can develop ponding or membrane failures, while buildings built before 1980 often lack adequate vapor barriers and envelope sealing. These conditions make roof and exterior moisture relevant to an HVAC recurrence assessment.
Commercial systems need attention beyond visible duct surfaces. Inspect air handlers, coils, drain pans, and duct sections for condensation or moisture buildup. Buildings with shared systems should consider whether airflow connects affected spaces. Records of where moisture appears, what was repaired, and which components were inspected can help identify recurring patterns.
After mold removal, confirm that the moisture source has been corrected and affected materials are dry. If visible mold returns near the same register, ceiling, or equipment, inspect nearby plumbing, roof areas, and condensate drainage. Repeated growth in one location points to a condition that cleaning alone won’t resolve.
Keep the prevention plan practical: monitor humidity, inspect condensation-prone components, and document repairs. For persistent moisture or recurring growth, arrange mold testing and inspection to assess affected areas and guide next steps.
My Pure Environment SF: Mold Remediation
My Pure Environment SF helps property owners address suspected HVAC mold with Mold Testing & Inspection, Mold Remediation, and Indoor Air Quality Improvement. Testing and inspection can help clarify where mold or moisture problems are present, while remediation addresses affected areas. If recurring growth appears near a bathroom or attic, those spaces may need targeted attention, too.
Consider an assessment if visible mold returns, musty odors persist, or moisture concerns remain after duct cleaning. The findings can help define next steps and focus attention on conditions contributing to the problem.
For help assessing a mold concern or planning remediation, visit mypureenvironmentsf.com.
Make your next step a clearer one
After duct work, focus on what the findings mean for your property and what decisions they support. Keep inspection notes, testing results, and records of moisture repairs together. This gives you a practical reference if odors return, visible growth appears, or you need to explain the history to a building manager. It also helps distinguish a resolved issue from one that still needs attention.
If you’re assessing mold in an HVAC system in San Francisco, My Pure Environment SF offers Mold Testing & Inspection, Mold Remediation, and Indoor Air Quality Improvement. These services can clarify the concern and guide appropriate next steps, without treating duct cleaning as the only measure of success.
Contact My Pure Environment SF today to discuss your mold concerns. A clear assessment can help you move forward with greater confidence and a healthier indoor environment.
Frequently Asked Questions
Can mold in ductwork be cleaned, or does the ductwork need to be replaced?
It depends on the duct material and where contamination is present. NADCA’s ACR standard classifies mold-contaminated porous materials as Condition 3, requiring removal, while sheet-metal ductwork can be cleaned using source-removal methods. For example, growth on accessible metal differs from contamination embedded in porous duct insulation. Inspect the affected section and adjoining materials to determine whether cleaning or removal is appropriate.
How can I reduce the rate of air duct contamination?
Reduce dust and moisture entering or collecting in the HVAC system. Keep return grilles clear, replace a filter when it’s loaded with debris, and make sure it fits securely in its slot. Don’t overlook water: a leaking drain line or persistent condensation can dampen nearby materials and create conditions for contamination. If dust or musty odors return quickly, inspect the system and nearby areas for a source.
How do I prevent mold from coming back in the duct system?
Address moisture as well as affected materials. After cleanup, check whether the condensate drain flows freely, the drain pan empties, and insulation near the equipment stays dry. Keep a simple record of dampness, odors, or visible changes and where they occur. If the same symptom returns near the same register, use that pattern to guide a focused inspection rather than repeating surface cleaning alone.
How do you prevent mold from growing in San Francisco homes?
Control indoor moisture, repair leaks, and keep damp areas drying instead of remaining wet. In bathrooms, use ventilation during and after bathing, and check corners, window edges, and ceilings for recurring condensation. The U.S. Environmental Protection Agency says homeowners can clean mold areas smaller than 10 square feet themselves if they’re comfortable doing so and have no health risks. Visible growth elsewhere warrants careful assessment.
How is a mold test done?
A preliminary sampling approach uses two unique air samples and an air duct fiber sample. If visible mold is present, professionals recommend adding a surface sample. The sampling plan depends on the concern: suspected growth on a vent cover differs from an odor with no visible source. Results are most useful when sampling locations and observations are recorded, so findings can be interpreted alongside the property’s conditions.
How long does it take to get rid of mold in a house?
There isn’t one duration for every house because the work depends on the affected area, material, access, and moisture source. My Pure Environment SF states that its typical remediation treatment takes 3-4 hours. That treatment time doesn’t represent every task a property may need; inspection, testing, moisture correction, and any separate repairs can affect the overall project schedule.
What are signs of mold in an HVAC system?
Possible signs include visible growth near a register, a musty odor that becomes noticeable when heating or cooling runs, or dampness around HVAC components. A clogged drain or condensation can also signal moisture that needs attention. These clues don’t identify the material on their own. Note where and when they occur, such as an odor in only one room, to help focus an inspection.
What causes mold to grow in HVAC systems in San Francisco?
Moisture is the key condition, and San Francisco’s coastal fog contributes to ambient humidity across the Bay Area. Condensation around coils, a poorly draining pan, or damp duct insulation can add moisture inside an HVAC system. Older buildings may also have limitations in envelope sealing or vapor barriers, while dense construction can restrict ventilation and sunlight. Together, these conditions can make moisture slower to dissipate.